This guide focuses on applying what you're learning about pixeling to the more technical process of creating EO style pixel art.
This guide was created by me and is my property. If you reproduce it in any way, you must credit me. -Cirras
This is the Armor Sprite Sheet. Sprite sheets are templates for items. The different poses make up all the different animations that an armor has in the game. Here's how the template is laid out:
1/2: Standing Front/Back
3-6: Front Walking
7-10: Back Walking
11/12: Magic
13-16: Attack
17/18: Sitting in Chair
19/20: Sitting on Ground
21/22: Archery
All sprite sheets can be found here.
Okay, so let's say we want to make some armor. We'll use the Valiant armor from the gallery as an example.
As you can see we just pixel the armor over the sprite. The sprite will be removed later. You'll need to complete all the frames before the item can be fully functional in the game.
Inventory size for armors is always 2x3.

Drop frames do not have a standardized size. You should use the existing drop frame of a similar item as a template. Here's an example, which can be expanded and then adjusted as needed.
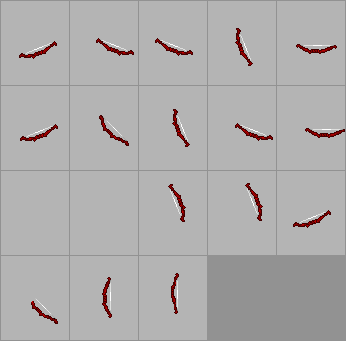
This is the Weapon template. As you can see, weapons are simple to sheet, as every new frame is just a rotation of the first frame. Here's how the template is laid out:
1/2: Standing Front/Back
3-6: Front Walking
7-10: Back Walking
11/12: Magic Front/Back
13: Front Attack 1
14: Front Attack 2[under]
15-16: Back Attack
17: Front Attack 2 [over]

You might be wondering what the deal is with the two front attack frames. Frame 14 will be displayed under the sprite, and frame 17 will be displayed over the sprite.
If you look at frame 17, you'll see the hilt is erased. This is so the hilt will be under the character sprites hand, but the rest of the sword is displayed over the legs.
The spot of the weapon you need to erase in frame 17 will vary based on the type of weapon, but the general concept remains the same. That's just a matter of matching up the frames and using common sense.
Let's look at how to fill out the sheet with weapons. First, we'll make our first frame. Be sure to get that angle right, we're not going for horizontal.
Using Graphicsgale here will simplify the process a lot. [If you're not, then instead of rotating you'll have to manually redraw each angle.]
Copy the first frame and rotate it, matching it as closely to the angle of the next uniquely angled frame [Frame 4] as possible.
There are really only a few unique angles in the sheet. If your weapon is symmetrical, then these unique angles are the only times that you will have to rotate or redraw.
You'll notice that after rotating the first frame, it looks kind of... Well, lame. The outline is probably broken at least a little, and the shading is probably messed up.
No problem! Let's just clean that up. Fix the outline/shading and make sure it matches the line's angle properly.
Repeat the process for any more unique angles in the sheet. [Look at frames 4 and 5]
Now it's just a matter of flipping your nice existing frames around or doing some 90/180 degree rotations on them to fill up the rest of the sheet.
Remember that if your weapon is not symmetrical, you'll have to rotate or redraw most of the frames. If you follow the process as if it's symmetrical when it isn't, the weapon will flip all around in the players hand. You definitely don't want that.

Inventory size for weapons come in all shapes and sizes, there is no standard size.
All inventory templates can be found here.
This drop frame will work as a template for any other weapons drop. Expand and adjust as needed.
A lot of people simply copy and paste the first frames weapon into the drop frame. While this doesn't really look bad, it looks better if the weapon is redrawn a little to appear flat on the floor, like the example.

There are some types of weapons that require different angles or even slightly different layouts. The general concept remains unchanged when sheeting these types of weapons.
Bows add an extra frame, but the sheet is extremely straightforward and most bows have the same basic shape, so creating a bow from this template should be simple.
The scythe is an example of the angle of staff or staff-like weapons in EO. The layout is exactly the same as standard weapons, the design is just a little different. Using the wooden part of the scythe as a lineart base should make for some easy staffs, and you can graduate on to more complex creations from there.

This is the Shields template. Shields are easy because they only have to be redrawn once. Here's how the template is laid out:
3-6: Front Walking
7-10: Back Walking
11/12: Magic Front/Back
13/14: Front Attack
15-16: Back Attack

Standard shields are just a matter of creating the first frame of the shield, copying that shield and occasionally flipping it to fit all the other frames except frame 14, and finally slightly modifying the shield to fit frame 14 (Front Attack frame.)
There is a variation on the standard shield called Back Items. Back Items include wings and arrows. This is the template for back items.
1/2: Standing Front/Back
3/4: Attack Front/Back
5: Unused
The big difference between standard and back is that back items, as the name implies, are hardcoded to appear under the character sprite, on the back.
Typically shield inventories are 2x2-2x4, but there is no real standard.
All inventory templates can be found here.

This drop frame will work as a template for any other shields drop. Expand and adjust as needed.
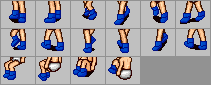
This is the boots template. Here's how it's laid out.
1/2: Standing Front/Back
3-6: Front Walking
7-10: Back Walking
11/12: Attack
13/14: Sitting in Chair
15/16: Sitting on Ground
Boots can be a little tedious to sheet, but they are pretty simple.
These template boots are a good indicator of how thick your boot should be to match armor outlines and not appear awkward on the character sprite. Modify the first frame until you have the boot you want, and then apply those changes to the rest of the sheet. Ta-daa! Done.
Boot inventories must be 2x2.
This drop frame will work as a template for any boots you make. Expand and adjust as needed.
Notice that the Hats template is split into male and female versions. This is important, the positioning of the sprite's head is a little different between the male and female sprites. The layout goes like this:
1: Front [male]
2: Back [male]
3: Front [female]
4: Back [female]
Standard inventory size for Hats is 2x2.
All inventory templates can be found here.
This drop frame should work as a template for any hat you make. Using the first frame usually looks fine for hats, but it may depend on the kind of hat.
This covers a wide variety of items, including rings, bracelets, gloves, belts, necklaces, gloves, and crafting/miscellaneous items.
They are only inventory and drop frames, so there's obviously no sheet for them.
As a result these are the easiest items to make.
While paperdoll accessories
have standard sizes, miscellaneous items can be any size. These are the standard paperdoll inventory sizes:
Rings/Bracelets/Bracers/Charms: 1x1
Belts/Necklaces: 1x2
Gloves: 2x2
All inventory templates can be found here.
For smaller items like rings/bracelets/charms, it's often acceptable to use the inventory view in the drop frame. For the most part, you'll want to make a new drop frame that follows isometric perspective.
Because this category of item varies in size so much, you should use an armor or weapon drop frame and simply center your item on that. There is no standard size frame to give.
NPCs are a bit of a different story than the other things we've looked at so far. They do not have a set frame size, because NPCs vary widely in size.
When creating an NPC it
is best to use the frames of a previously existing NPC of a similar size.
This is an example sheet, but keep in mind that the frame size is not standard.
Here's how the sheet is laid out:
1: Standing Front
2: [Often Blank] Front Standing Animation
3: Standing Back
4: [Often Blank] Back Standing Animation
5-8: Front Movements
9-12: Back Movements
13/14: Front Attack
15/16: Back Attack
17/18: [Blank]
Some GFX slots cause a Standing Animation, which consists of a pairing of the first and second frames [Front standing animation], and a pairing of the third and fourth frames [Back standing animation.]
It's best used for NPCs that you want to appear to be breathing, floating, or likewise doing some kind of action while standing. [The tapping foot of EO Main's Guild Master is an excellent example.]
It could also be used for NPCs involving some sort of non-static element such as fire, water, or electricity.